
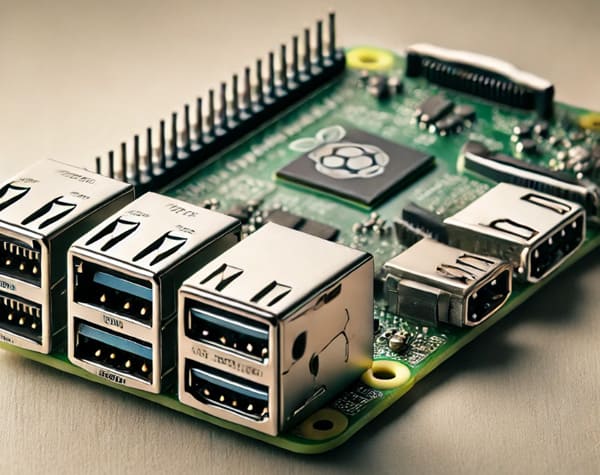
The Raspberry Pi 4 is a game changer for tech lovers and hobbyists alike. It’s a tiny computer that packs a punch, making it perfect for projects at home or school. Setting it up is easy and fun, even if you're new to coding or electronics.
With its powerful features, you can create everything from a media center to a retro gaming console. This setup guide will walk you through the basics so that you can start your journey with the Raspberry Pi 4. Get ready to explore what this little device can do!
Choosing the Right Raspberry Pi 4 Model
Different Models Overview
Raspberry Pi 4 comes in different models. The main options are the 1GB, 2GB, and 4GB RAM versions. Each model has unique features. The most noticeable difference is the amount of RAM. More RAM allows for better multitasking and running heavier applications.
The connectivity options also vary among the models. All versions have dual-band Wi-Fi and Bluetooth, but the number of USB ports differs. For example, the 4GB model has two USB 3.0 ports faster than USB 2.0. This speed can be important for projects needing quick data transfer.
Typical use cases differ by model as well. The 1GB model works well for simple tasks like basic coding or learning. The 2GB version suits users who want to run small servers or media centers. The 4GB model is great for advanced tasks like gaming or programming complex applications.
Factors to Consider
Before picking a Raspberry Pi model, think about your intended use. Will you use it for simple projects or more demanding ones? Knowing this helps narrow down your choices.
Budget constraints matter, too. The prices vary by model, with the 1GB being the cheapest and the 4GB costing more. Choose a model that fits your wallet while meeting your needs.
Compatibility with existing hardware and software is another factor. Check if your current devices can connect with the Raspberry Pi. Also, ensure that any software you plan to use works on your chosen model.
Comparing Specifications
Processing power varies among Raspberry Pi models. All models use a quad-core processor, but performance may differ slightly based on RAM size. More RAM generally means better performance when running multiple programs.
Memory capacity impacts how smoothly your Raspberry Pi runs applications. A higher memory capacity allows for better handling of larger files and more applications at once. For instance, using the 4GB model for programming will feel smoother than using the 1GB version.
I/O ports are crucial for connecting devices to your Raspberry Pi. Each model has HDMI ports, USB ports, and Ethernet connections. The number of these ports can limit or enhance what you can do with your project. For example, more USB ports allow connecting keyboards, mice, and other accessories simultaneously.
Preparing Your SD Card
Selecting the SD Card
Start by checking how much storage you need. Projects can vary in size. A minimum of 16 GB is often recommended. However, larger projects may require 32 GB or more.
Next, consider the speed class of the card. Cards come in different classes, like Class 10 or UHS-I. Higher speed classes allow for faster data transfer. This means quicker boot times and smoother performance.
Finally, think about reliability. Not all brands are equal. Look for well-known brands like SanDisk or Kingston. These brands have a good reputation for quality and durability.
Formatting the SD Card
Formatting the SD card is important for compatibility. An unformatted card may not work with your Raspberry Pi. Formatting clears any old data and prepares it for new use.
Choose the right file system when formatting. FAT32 is usually the best option for Raspberry Pi OS. It works well across different devices and systems.
Follow these steps to format your card:
-
Insert the SD card into your computer.
-
Open Disk Management on Windows or Disk Utility on Mac.
-
Select the SD card and choose "Format."
-
Select FAT32 as the file system.
-
Click "Start" to begin formatting.
Downloading the OS Image
Find official sources for Raspberry Pi OS images. The Raspberry Pi Foundation website has reliable downloads. Always download from trusted sites to avoid issues.
After downloading the image, verify its integrity. This step ensures that the file is complete and correct. Use the checksums provided on the download page to confirm this.
Choose the right OS version based on your needs. Some versions are optimized for specific tasks or projects. For example, Raspberry Pi OS Lite is great for headless setups.
Writing the OS Image
Writing the OS image to the SD card is a crucial step. Many methods exist to do this, but using software makes it easier.
Balena Etcher is a popular tool for writing images. It’s user-friendly and works on Windows, Mac, and Linux. In Etcher, simply select the downloaded image and your SD card, then click "Flash!"
Following the correct procedure is vital. Improper writing can lead to errors or file corruption. Always double-check that you selected the right drive before starting.
Initial Setup and Configuration
Connecting Peripherals
To start the setup process, you need some essential peripherals. These include a keyboard, mouse, and monitor. You can use most USB keyboards and mice. For the monitor, any HDMI-compatible screen will work.
Connecting these devices is simple. Plug the keyboard and mouse into the Raspberry Pi's USB ports. Then, connect the monitor using an HDMI cable. Using compatible devices is important. It ensures that everything works smoothly during your setup.
Powering On the Pi
Next, you will power on the Raspberry Pi. First, ensure that all peripherals are connected properly. Then, plug in the power supply to the Raspberry Pi.
Using the correct power supply is crucial. The Raspberry Pi 4 needs a 5V USB-C power adapter that can deliver at least 3A of current. This ensures that it gets enough power for all connected devices.
When you power the board on, you should see lights flashing. This indicates that it is booting up correctly. Wait for a few moments as it prepares for its first use.
First Boot Steps
After powering on, you'll encounter initial configuration prompts. These prompts guide you through setting up your Raspberry Pi for the first time.
Setting up a user account is important. It allows you to personalize your experience and keep your data secure. Follow the prompts to create a username and password.
Navigating the first boot interface is straightforward. Use your keyboard to move around and select options. Read each prompt carefully to make sure you set everything correctly.
Running the Setup Wizard
Now it's time to run the setup wizard. This wizard helps you configure your Raspberry Pi quickly and easily.
During this process, you will choose language and regional settings. Select your preferred language from the list provided. This helps ensure that menus and prompts appear in a language you understand.
You will also have the option to configure updates during setup. Keeping your system updated is important for security and performance. Choose to check for updates now or later based on your preference.

Installing the Operating System
Raspberry Pi OS Overview
Raspberry Pi OS is the official operating system for the Raspberry Pi. It is user-friendly and designed specifically for this device. The desktop version offers a clean interface that makes it easy to navigate. Users can find common tools and settings right on the desktop.
The operating system comes with several pre-installed applications, including a web browser, text editor, and programming tools. This setup helps users get started quickly without needing to download extra software.
Installing Raspberry Pi OS
Installing Raspberry Pi OS is straightforward. First, download the image file from the official website. Then, write this file on your micro SD card using specific software like Balena Etcher or Raspberry Pi Imager.
You can choose between two installation options: headless or GUI installation. A headless installation means setting up without a monitor. This option is great for advanced users who prefer working remotely. On the other hand, a GUI installation allows you to see everything on a screen as you set it up.
During installation, some users may face issues. If the operating system does not boot, check your microSD card for errors. Ensure that it is properly formatted before writing the image file. Also, verify that your power supply meets the requirements of Raspberry Pi 4.
Using NOOBS Installer
NOOBS stands for "New Out Of Box Software." It simplifies the installation process for beginners. With NOOBS, users can install Raspberry Pi OS easily and quickly.
To use NOOBS, first download it from the official site and copy it to your microSD card. After inserting it into your Raspberry Pi, turn on the device. NOOBS will present you with options for installing different operating systems.
Follow these steps to install using NOOBS:
-
Select Raspberry Pi OS from the list.
-
Click on "Install."
-
Wait for the process to complete.
Once installed, users can also try other operating systems if desired. This flexibility allows experimentation without complex setups.
Basic Configuration
Changing Default Password
Security is very important. The first thing to do is change the default password. This helps protect your Raspberry Pi from unauthorized access.
-
Open the terminal on your Raspberry Pi.
-
Type
passwdand press Enter. -
Follow the prompts to enter your new password.
Create a strong password. Use a mix of letters, numbers, and symbols. Avoid common words or phrases. A good example is “RaspberryPi2023!” This makes it harder for someone to guess.
Connecting to Wi-Fi
Next, connect to Wi-Fi. This allows you to access the internet easily.
-
Click on the Wi-Fi icon in the main menu.
-
Select your network from the list.
-
Enter the Wi-Fi password and click "Connect."
If you have trouble connecting, check these common issues:
-
Ensure the Wi-Fi is turned on.
-
Make sure you enter the correct password.
-
Restart your router if needed.
Securing your Wi-Fi network is also crucial. To improve security, change your router's default settings and use WPA2 encryption.
Setting Up Locales
Setting up locales is important for language and region settings. This affects how your system behaves and displays information.
-
Open the terminal.
-
Type
sudo raspi-configand press Enter. -
Navigate to "Localisation Options" and select "Change Locale."
Choose your preferred language and region from the list. This ensures that applications display content correctly based on your locale.
Locales can impact software behavior, too. For instance, date formats may change based on your region. Configuring this properly makes using your Raspberry Pi easier.
Updating the System
Keeping your system updated is vital for performance and security. Start by checking for updates:
-
Open the terminal.
-
Type
sudo apt updateand press Enter. -
Then, type
sudo apt upgradeto install available updates.
Regularly updating helps fix bugs and improve features in applications. Automating updates can save time:
-
Type
sudo nano /etc/apt/apt.conf.d/20auto-upgrades. -
Add
APT::Periodic::Update-Package-Lists "1";for daily updates. -
Save and exit.
This way, you ensure that your Raspberry Pi always runs smoothly with the latest packages.

Advanced Configuration Tips
Enabling SSH Access
Enabling SSH allows you to access your Raspberry Pi from another computer. This means you can control it without needing a monitor or keyboard. It makes managing your device much easier, especially in a hard-to-reach place.
To enable SSH, open the terminal on your Raspberry Pi. Type sudo raspi-config and press Enter. Navigate to "Interfacing Options" and select "SSH". Choose "Yes" to enable it. After that, you can use an SSH client like PuTTY to connect from another device.
Security is important when using SSH. Always change the default password to something strong. Consider using key-based authentication for better protection. This keeps your Raspberry Pi safe from unauthorized access.
Assigning Static IP Address
Using a static IP address has many benefits. It ensures that your Raspberry Pi always has the same address on the network. This is useful for remote access and running servers.
To assign a static IP, edit the dhcpcd.conf file. Open the terminal and type sudo nano /etc/dhcpcd.conf. Scroll down and add your desired static IP settings. Save the changes by pressing Ctrl + X, Y, and Enter.
Dynamic IP addresses can cause problems. They may change after each reboot or power cycle. This can make it harder to connect remotely or run services that require a fixed address.
Managing System Updates
Regular system updates keep your Raspberry Pi secure and running smoothly. You can manage updates easily with commands in the terminal. Use sudo apt update to check for available updates, then sudo apt upgrade to install them.
Scheduling updates can save time. You can set up automatic updates by editing the cron jobs. Regular maintenance helps prevent issues and keeps software up to date.
To check update history, use apt history. This shows what has been installed or removed. Knowing this helps troubleshoot any problems that arise.
Scheduling Tasks with Cron
Cron jobs are useful for automating tasks on your Raspberry Pi. They allow you to schedule commands to run at specific times or intervals. For example, you can set up a cron job to back up files every night.
To create a cron job, type crontab -e in the terminal. Add your command followed by the schedule format. For instance, to run a script every day at 2 AM, write. 0 2 * * * /path/to/script.sh.
Managing cron jobs is easy once you know how to do it. You can view all scheduled tasks with crontab -l. This helps keep track of what runs when.
Exploring Creative Projects
Playing Retro Games
Retro gaming is popular among many Raspberry Pi users. People enjoy playing classic games from consoles like NES and Sega Genesis. Emulation software makes this possible. Programs like RetroPie and Lakka allow you to run these games easily.
Setting up emulators can be straightforward. First, install the software on your Raspberry Pi. Next, add your game ROMs to the correct folder. Configure the controls to match your preferences. Lastly, enjoy a trip down memory lane with your favorite games.
Using GPIO Pins
GPIO pins are essential for many Raspberry Pi projects. They allow you to connect sensors, lights, and motors, opening up a world of possibilities for hands-on learning.
Common applications include building a weather station or controlling LED lights. You can even create simple robots using these pins. Always remember safety when working with GPIO. Avoid touching the pins while the power is on to prevent damage.
Connecting USB Drives
Connecting USB drives to your Raspberry Pi is easy. Just plug the drive into one of the USB ports, and the system will automatically detect it.
Next, manage files through the file manager interface. You can copy, move, or delete files as needed. Formatting may be necessary to use the drive with other devices. Use the command line or file manager to format it for compatibility.
Utilizing the Camera
The Raspberry Pi camera module adds fun features to your projects. It captures photos and videos with great quality, making it perfect for creating security cameras or time-lapse photography projects.
To connect the camera, plug it into the camera port on your Raspberry Pi board. Then, please enable it in the settings menu. Follow tutorials online for specific project ideas using the camera module.
Troubleshooting Common Issues
Boot Problems
Boot problems can happen for several reasons. A common issue is a corrupted SD card. This can stop your Raspberry Pi from starting up. Sometimes, the power supply might not provide enough voltage.
To fix boot issues, start by checking the power supply. Make sure it meets the required specifications. If the SD card is corrupted, you may need to reformat it. Use a computer to format the card and reinstall the operating system. You can find guides on forums dedicated to Raspberry Pi.
Network Connectivity Issues
Network problems often frustrate users. A common issue is not being able to connect to Wi-Fi. Other times, the Ethernet connection may fail as well.
To diagnose network issues, use tools such as ping or ifconfig. These tools help check if your device connects correctly to the network. If you experience slow speeds, check for interference from other devices nearby. Moving closer to the router can also help improve performance.
Peripheral Compatibility
Checking peripheral compatibility is very important. Not all devices work smoothly with Raspberry Pi 4. Some keyboards, mice, or printers may not function correctly.
Here’s a list of commonly used compatible peripherals:
-
USB keyboards
-
USB mice
-
HDMI monitors
-
USB flash drives
If a peripheral does not work, try using another one. Sometimes, updating software or drivers can solve compatibility issues.
Performance Optimization
Optimizing performance helps your Raspberry Pi run better. Overclocking is one method that can increase speed. However, this may cause extra heat, so cooling solutions are essential too.
Use heat sinks or fans to keep temperatures down. Effective resource management also improves performance. Close unused applications and processes running in the background.

Final Remarks
You’ve set up your Raspberry Pi 4, and now the fun really begins. You've covered all the basics, from choosing the right model to troubleshooting. Your Pi can do so much! The possibilities are endless, whether a media center or a retro gaming console.
Now, get creative! Try out some projects or tweak settings to make it truly yours. Don’t hesitate to explore online communities for tips and ideas. Your Raspberry Pi journey is just starting. So, roll up your sleeves and let your imagination run wild. Happy tinkering!
Frequently Asked Questions
What is the best Raspberry Pi 4 model for beginners?
The Raspberry Pi 4 Model B with 2GB or 4GB RAM is ideal for beginners. It balances performance and price, making it perfect for basic projects and learning.
How do I prepare my SD card for Raspberry Pi?
Use a computer to format the SD card as FAT32. Then, download the Raspberry Pi Imager tool to write your chosen operating system onto the card. This step ensures proper installation.
What operating systems can I install on my Raspberry Pi 4?
You can install various operating systems, such as Raspberry Pi OS, Ubuntu, LibreELEC, etc. Choose based on your project needs; Raspberry Pi OS is user-friendly for beginners.
How do I connect my Raspberry Pi to Wi-Fi?
During the initial setup, select your Wi-Fi network and enter the password. If you miss this step, you can also configure Wi-Fi later using the terminal or desktop settings.
What are some creative projects I can try with my Raspberry Pi 4?
You can create a media center, retro gaming console, home automation system, or even a personal web server. These projects help you learn while having fun.
How do I troubleshoot common issues with my Raspberry Pi?
Check connections first. Ensure your power supply is adequate and that the SD card is properly inserted. For software issues, try re-flashing the OS or checking online forums for solutions.
Can I use my Raspberry Pi without a monitor?
Yes! You can access your Raspberry Pi remotely via SSH or VNC from another computer. This method is great for headless setups where you don't need a monitor connected.


Leave A Comment